How to Get Live Weather Information into SharePoint Online

Adding Weather Information to SharePoint Master Page: Simple Steps for Integration

In just a few simple steps, you can insert weather information under the site icon in the master page. I recommend using the custom master page location because it is easy to find the site logo on the master page. You can place the code just about anywhere on the page such as the Content Editor Web Part or Code Snippet Web Part. In this example, we will be placing the code in the master page. Start by using the simpleWeather jQuery plugin. There are lots of features and configurations to this plugin. You can check out all the parameters and demos at the simpleWeather site here. In this example, we are going to put in a zip code and get two data points: current temperature and current conditions. These are just two of several data points that the service can receive. Two simple steps:

  • Add weather location script to SharePoint
  • Add 4 lines of code to master page

The first thing that needs to be done is to create a copy of the current master page. We don’t want to add code or alter the default master page(s). For

    this example, we used the seattle.master, but it can be applied to either seattle.master or oslo.master.  (Figure 1) The current look of our site before the weather is added.

    Step 1) Create JavaScript File

    Create a JavaScript file that has your zip code and data you want to display. In this example, we put the zip code (Macomb, MI in the example, but any zip code will do) in the location (line 4). Line 8 (Figure 2) is where the data we want to get is gathered. In this example, we are adding the current temperature and current conditions.

    (Figure 2) – JavaScript File Code Screenshot Now we need to save this file and upload it to the SharePoint Site Assets library located at <siteURL>/SiteAssets. For this example, we saved the file and named it index.js, but you can name it anything you want as long as it is referenced in the master page. We also created a folder “JS” in our Site Assets Library to easily access our page, but this is not necessary.

    Step 2) Open Master Page

    Open your custom master page in SharePoint Designer and search for the word “siteIcon”. In this example, it is found on line # 296 of the master page (Figure 3). Under the closing </div> tag, we must add 4 lines. On the first (line 303) line, add a new div tag with the id that is named in your JavaScript file that you uploaded to the Site Assets Library. In our example, it is “weather”, but it could be any name as long as they both match. Next, add a line to get the jQuery library file and then a line to get the simpleWeather library file. In this example, we are using the Content Delivery Network (CDN) for both, but you could also download each file and put it in the Site Assets Library and reference them at that location. Both were tested and they work the same. The final line is to reference our JavaScript file that we made in Step #1 (line #306). That’s it. Save the master page and make sure to check it back in.

    Your Weather Update is Available

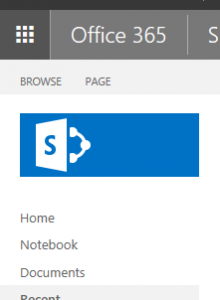
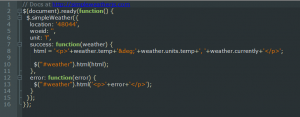
    Now when you go to your site, you should have the weather under the site logo (Figure 4). As previously stated, you can pass more or different data points. Show the weather in just about any area on the page and style it anyway you want. 
    SharePoint Online master page.  (Figure 4) – SharePoint Weather Update This solution was tested on SharePoint 2010 and SharePoint 2013 on premise and it works as expected. We did not test SharePoint 2007 or SharePoint 2016, but it should work on those also. Attached is the zip file for your code. In the index.js, simply change the location to your desired location and in the MasterPageCode.html change the location for the index.js to the location you placed it and you should be up and running. Written by Michael Luttenberger – SharePoint Solution Architect